
 Purpose:
This article is a culmination of the work of many on this and other web sites. The sole purpose is to clearly define and outline the steps necessary to modify your HP EX485/487 MediaSmart Server (or MSS) from a single core Intel Celeron 440 to the more powerful Intel Dual Core. It will present various options for the MSS user and provide a one stop resource for the complete upgrade process. Choosing a CPU, performance gains/benchmarks, power consumption temperature and memory upgrades are discussed as well.
I will try to sort through some of the technical jargon and issues that can make this process complicated. While the scope of this article will toward the E5200 CPU that has been extensively tested, it will also list other CPU designations reported to work for your consideration.
Depending on your level of expertise you might find some topics interesting or boring, but they’re listed here regardless of your abilities. Some useful tips have been included and some very useful links have been placed in the reference sections at the end of the article.
Warning and Disclaimer:
Read this document completely before diving in! The author of the article assumes no responsibility for “bricking” “smoking” or voiding the warranty of your MSS as a result of your action. Safe to say, if you take the cover off you have probably voided the warranty. If you do not feel comfortable with disassembly, modifications, handling electronics parts, software configuration or are not familiar with electrostatic procedures, you should stop here and get help.
OK, now that we have satisfied the lawyers out there lets move on…
Background of the Media Smart Server:
The HP MediaSmart Server EX48X series (EX485 & EX487) are the second generation servers in the MediaSmart Server line, released as the successor to the EX470 and EX475. The EX485/7 come provisioned with an Intel Celeron 440, single-core 2Ghz processor. This was an upgrade over the less powerful AMD cores used in the 470 series.
The Celeron 440 provides reasonable performance for basic operations, WHS administrations, backups, photo management and file functions on your network. Unfortunately, when you ask it to run other add-ins, such as CPU intensive audio and video streaming/compression, it runs out of steam quickly. This results in dropouts, pauses and other issues.
What’s the Solution?
There is no total solution because of the limitation of the HP hardware and intent of design. Some of the limits are: a minimal power supply, passive CPU cooling with low air circulation, limited case size, and an unforgiving proprietary motherboard that is nearly impossible to buy on the open market with no recovery features. While we can’t solve all the problems we can improve performance to a more acceptable level and limit the risks of the modification.
Cost:
How much will this cost me and is it worth it? Obviously this is a major consideration unless you’re a hobbyist or just love hacking. It does not make much sense dumping a ton of money into a platform that, in the end, won’t perform as you expect it to. Sometimes we just have to admit that no matter how hard we try we just can’t make a pig fly. This is the conclusion that some have come to.
If you are thinking this upgrade will make the 485 a “barn-blazing video-eating audio-blasting end-all” platform, forget it. What it will do, however, is give you a 100% performance increase over the Celeron 440, and can be done for around $60.00. Granted, you could spend a great deal more, but how much you want to spend and how deep you go is up to you.
What’s next? Choosing a Processor:
This depends on the route you choose and the processor you select. For those who want transparency and minimal work should buy an Intel Dual Core E5200 processor with sSpec of SLAY7 or QFHQ. This sSpec specific core will provide the all around best bang for the buck with the least amount of implementation work or operational issues. The E5200’s are readily available both new and used from many sources. E5200 processors are also used in the third generation of the MediaSmart Server.
Let’s talk a little about what this sSpec code is all about. (I will cover the E5200 sSpec SLB9T later in the article).
What is an sSpec?
The sSpec number is also known as the specification number and stepping code. It contains 5 characters (SLAY7, for example) stamped on top of the processor and printed on the box to identify it.
Do Intel processors of the same model have the same sSpec?
Not necessarily. The same processor number can have many different sSpecs codes because when a processor stepping change occurs, a new sSpec is generated for that stepping. It is also true that the same stepping level can also have more than one sSpec associated with it.
What is a processor stepping?
It is the revision level of the CPU silicon. The stepping version can be changed for a number of reasons. These can be to fix some errata, raise the performance/ clock speed, modify die sizes, or to reduce power consumption, and can include micro code changes or updates. Generally, a higher stepping version is better, but not in the case of compatibility with the EX485.
When stepping version change, what is the naming convention?
Each stepping gets a different name. The usual naming convention is to change the letter of a stepping on each full-layer stepping and change the number of a stepping on the metal-layer stepping. As an example, the first full-layer stepping from A0 would typically be B0, while the first metal-layer stepping from A0 would be A1. In the case of our target processor, the E5200, there are three sSpec versions using 2 stepping models, M0 and R0. M0 is the most compatible for our MediaSmart Server application and the desired choice.
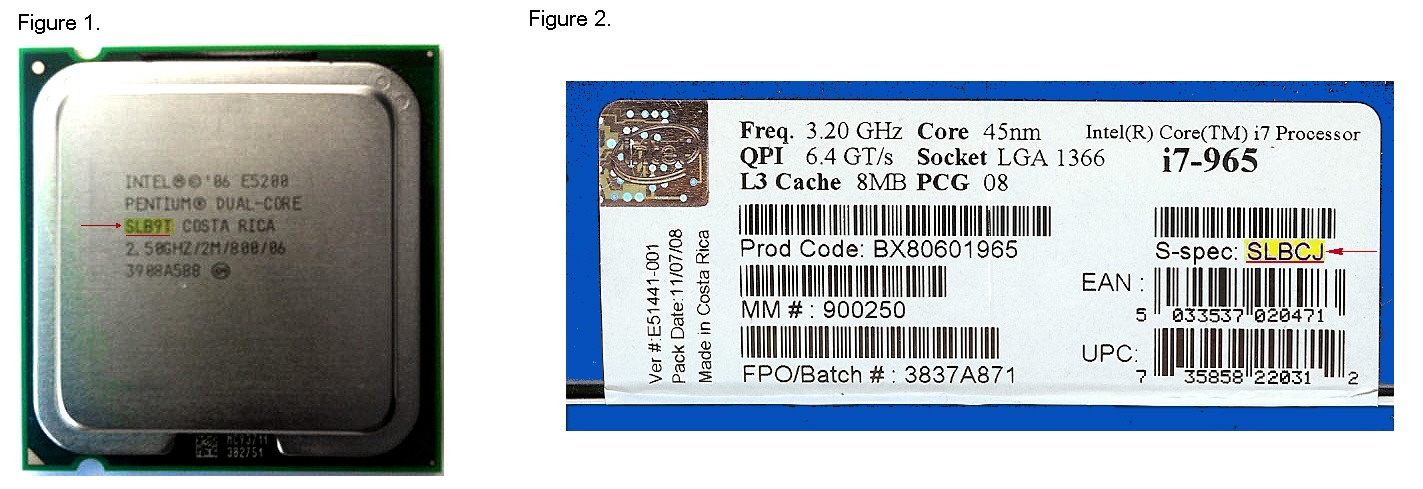
Where can the sSpec value be found?
You can find sSpec value by looking at the markings on the processor top-side (see Figure 1), or on the bar code label on the side of the processor box (Figure 2). Here’s an example of each location.
Why is all this stuff important?
This information is important because it is necessary to know how to identify and select sSpec for a given CPU, and also to select the one that will work best for our application. Before you agree to purchase any CPU be sure the seller can provide the sSpec code.
Which Intel CPU should I use and how this choice affects BIOS settings:
Many have mentioned having some success with other dual-core Celeron, Pentium, and Xeon units. Some of CPU’s reported to work are the: E3300, E3400, E4400, E6300, E6420, E8200, L3110 Xeon’s and a few others. Some of these processors have higher clock rates, larger cache sizes, and advanced technologies, some of which will be taken advantage of.
For a CPU to be utilized for optimum performance, the motherboard and chipset must contain the information to accommodate the processors abilities and operating parameters. This is partly done in the system BIOS.
BIOS (Basic Input/Output System) is a set of instructions and parameters that CPU uses to bootstrap or begin startup. The BIOS also provides the necessary code to hand off the boot process to the boot loader on the hard drive and boot the operating system. The BIOS for the 485 is contained on a single flash chip on the motherboard.
As you can see, the BIOS is a key consideration. Values specified in the BIOS that do not fully match the CPU can easily cause operational inconsistencies.
The Intel E5200 appears to be the upgrade processor of choice. This article will focus on the use of this core. This is not to say that the E5200 is the best selection, but it does have a number of features that put it high on the list.
First, it is the same processor that HP is using in the third generation EX495. Second, it is cheap (approx $60.00) and easy to find on the open market. Third, it provides a noticeable improvement over the stock Celeron 440 core. And finally, it can be implemented with no adverse operational issues.
>> Next page: The Intel E5200 vs. Celeron 440 Comparison >>[[page]]
The Intel E5200 vs. Celeron 440 Comparison
- Clock Rate: 2.5 vs. 2.0
- L2 Cache: 2MB vs. 512k
- Process: 45nm vs. 65nm – (a smaller number is better, the E5200 uses reduced size core semiconductors)
- TDP (Thermal Design Profile): 65w vs. 35w – (the Celeron draws less power but not appreciable in actual testing). This is one of the most important considerations when picking a dual-core processor. You do not want to select a core with a TDP rating greater than 65w. Exceeding this value can create issues for the power supply and generate too much heat to be properly dissipated by the passive cooling used in the 485.
Intel released 3 versions of the E5200 for general release, which can be identified by the SSpec code (see figure 1 and 2 above). Two of these, the SLAY7 and QFHQ versions, are the easiest to implement in the 485 and are stepping model M0.
No BIOS changes are required, this is simply a “remove the old CPU and install the new one” process. All functions of your MSS will work properly. The only exception is the monitoring of the backplane temperature of -128c/262f in the BIOS display. Windows Home Server software will also identify this core as a Pentium 3 XEON processor. Neither issue is detrimental to the operation of the MediaSmart Server and is totally transparent to the user.
One note: to obtain the optimal performance of this and any dual-core processor, speed stepping can be disabled. This is a controversial point which we’ll cover in the speed stepping discussion later on.
What must I do to uses the E5200 SLB9T?
The third version of the Intel E5200 was the SLB9T and is stepping model R0. The SLB9T is the current production E5200 release and by far the easiest to obtain. Because of the R0 stepping, some items in the BIOS will need to be modified before the core switch. You cannot simply change the CPU without making necessary BIOS changes; if you try you will end up with a server that will not boot.
You have two ways to implement this CPU:
The first way is to “Flash” the BIOS with the required changes. It requires nothing but a BIOS file; no cables/adapters/keyboards, and is the most cost effective. This is also the most dangerous method and can result in a bricked server. Should this happen you need to send your motherboard back to HP for repair, which will cost you a minimum of $65.00. Generally, when properly done flashing the BIOS is an un-eventful thing and USUALLY completes without problems.
Another complication for the MSS is that the user performing the update is totally blind to the process. There are no safeguards such as BIOS recovery jumpers used on most motherboards… not so great if you have problems.
The second (and recommended) method is to change the BIOS is through the use of a KVM adapter. This adapter will allow the user to connect a PS2 compatible keyboard, mouse, and VGA video monitor to the MediaSmart Server. It makes tweaking and experimenting with the MediaSmart Server easy, and also provides direct access to the Microsoft Home Server’s console, if needed.
This adapter will set you back anywhere from $60 to $90 dollars depending on the version you get, but is well worth it. Consider it a necessary tool and the pathway to the inner working of your MediaSmart Server. This adapter opens the door to things like booting and installing alternative operating systems from a flash drive. BIOS settings/changes and tweaks become a snap to do. You can also correct WHS errors from the console possibly saving you and your data from a full system recovery. If you consider the time and expense of buying the hardware pieces and parts to build your own, this purchase is a no-brainer.
The KVM is available from Charles at VOV Technologies. His email is: mss_cable_service@vovtech.com, or see this link for details on the adapter, the configurations available, and how to use it.
I think the Keyboard/Video/Mouse edition is the best choice for the average person even though I bought the one with the additional serial port just to play with. This unit is a well constructed, professionally built adapter. It is easy to install and Plug-n-Play.
Plug the included cable into the CN-9 connector on the MediaSmart Sever motherboard, then connect a compatible PS/2 keyboard, mouse, and monitor to the ports and you’re good to go. The adapter can be stored in the upper drive bay for easy access to the BIOS/Console at any time without disassembly of the MediaSmart Server. If all your drive bays are full, the cable can be placed behind the lower front plate so you can attach the adapter without case disassembly.
Let the fun Begin:
Before you do anything make sure your MediaSmart Server is fully functional and operating properly; starting with a sick or malfunctioning server is a sure recipe for disaster. You should have a recent backup and your server should be up to date. Boot the server a number of times and make sure all is well. Look at the event logs to make sure nothing out of the ordinary is occurring. Download and install CPU-Z, OCCT software to your server. This will help you verify core information, power, and temperature date, and also give you a base line. Perform detailed CPU benchmarks before and after the upgrade, you will be amazed at the results.
Based on the process you are using select the correct step below.
Required steps for the following processors:
I am using a E5200 sSpec SLAY7 or QFHQ
The process will be: case disassembly, CPU removal and replacement, case re-assembly, 2 reboots and it’s done! The BIOS setting for Dual Core Enabled will be automatically updated in the BIOS. Speed stepping will be left enabled by default (to optimize performance read the Speed Stepping discussions later in the article).
I am using a E5200 sSpec SLB9T or other CPU
For those using the E5200 SLB9T or other CPUs, the process will be: BIOS update/CMOS clear, case disassembly, CPU removal and replacement, case re-assembly, and then a couple of reboots to get everything recognized.
What will be affected: the server sleep and power down functionality will no longer work correctly and temperature monitoring features will be incorrect depending on CPU; not a big deal if your server runs 24×7 like most.
>> Next Page: More on the BIOS, Flashing: >> [[page]]
More on the BIOS, Flashing:
It should be noted that some of the users on various forums have modified the EX49x BIOS to work in the EX485 using the newer dual-core processors. These modified BIOSes correct the sleep/power down function and allow proper CPU identification, clearing the way for other processor use. Unfortunately, these modified BIOSes created some fan issues that have not yet been resolved. Hopefully the developmental work will continue.
Sadly, two major players working on these changes and very familiar with flashing have bricked their EX485’s during this endeavor. If you choose to use a BIOS load off the forums, it is most important you know the source of the BIOS you are using for flashing, but you must also know exactly what settings have been incorporated.
This can be very dangerous. You must be familiar with the flash process and have a stable power source before flashing. Consider plugging your MediaSmart Server into a UPS before starting this activity. Should your home power drop out during the flash process you might end up bricked. Never forget about Murphy’s law.
Again, BIOS upgrading must be done BEFORE the installation of the new CPU (other than those using QFHQ or SLAY7).
How do I Flash the BIOS and which version should I use?
There are a number modified BIOSes available for the EX485 which can be obtained simply by reading the threads listed in the reference section titled “The original HP EX485 CPU Upgrade Thread”, on MediaSmarthome.com You could download and apply one of them but that’s up to you.
What I suggest is to extract a copy of your own BIOS running on your server. You can then make the necessary changes and apply it back to your MediaSmart Server. The chance of applying invalid or corrupted BIOS is greatly diminished going this route. You can also initialize the CMOS during this process. (The CMOS contains information specific to your EX485 such as memory size, disk types, CPU clock and bus values, initializing it sets it to a startup or failsafe value.)
Extracting and re-applying the BIOS requires a few software tools. Download these to another computer and un-rar them. They will be transferred to a MediaSmart Server shared folder. (Note: you could also download them directly onto your MediaSmart Server via the Remote Desktop connection if you have unrar and unzip software loaded on your server)
The tools you’ll need are AFUWIN 4.xx and AMIBCP 3.xx. Click the links below to download them.
- Download AFUWIN 4.xx – After the download, unzip and find the folder name amiflash amibios afuwin 32 afuwin.exe.
- Download AMIBCP 3.37 – Un-rar to a folder you can get to late
Download to another computer then copy them into a shared folder on your MediaSmart Server under WHS. Now:
- Using the Remote Desktop Connection (or simply click Start, Run and enter: %SystemRoot%\System32\mstsc.exe /console /admin
- Log into your MediaSmart Server. Create a BIOS subdirectory under the C: drive, copy AFUWIN32.exe and AMIBCP.exe to this directory.
- Execute AFUWIN 32 and on the bottom click save (this will save a copy of your original bios, call it ORIGBIOS) You should always maintain a copy of this file.
- close AFUWIN
- Execute AMIBCP, open the saved BIOS file: ORIGBIOS you saved using AFUWIN above.
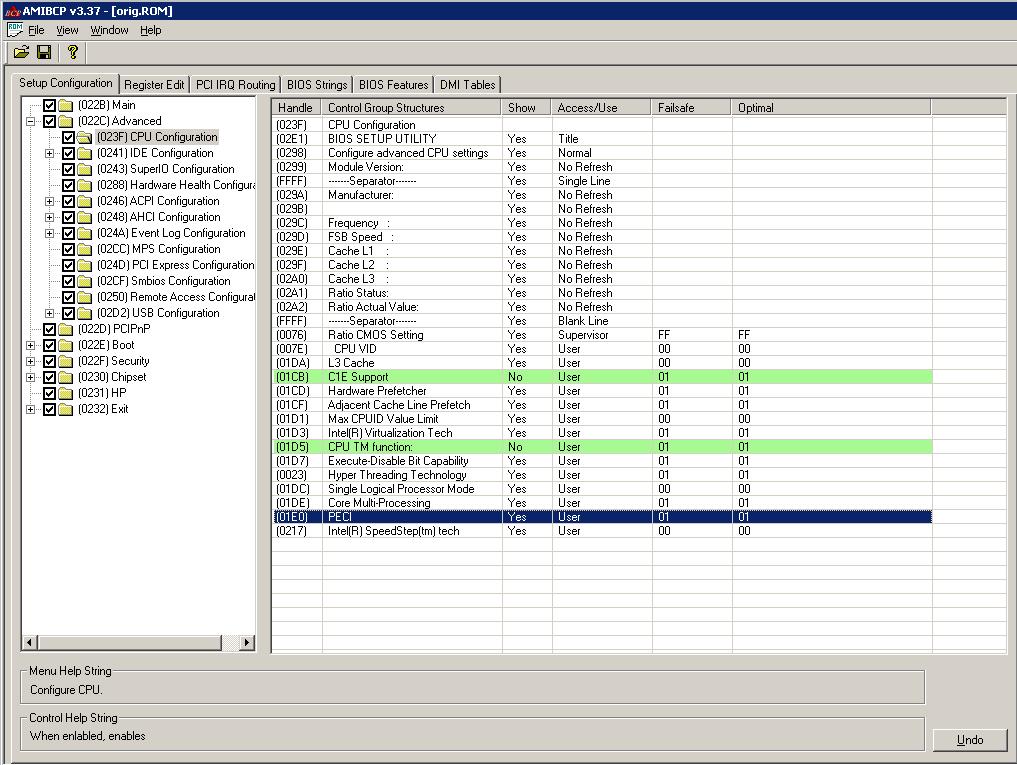
- Go to the Setup Configuration , Click Advanced then Click CPU Configuration and then on the right you should only change the following (see Figure 3 below)
- Change the Original ConfigurationPECI 00 00 (old value)
Mandatory Change
PECI 01 01 (new value)
- This is optional and affects speed stepping
Intel® SpeedStep Tech 01 01 (old)
Optional Change
Intel® SpeedStep Tech 00 00 (old)
- Leave all other values as they are (unless you know exactly what you are changing)
- Save the file as (MODBIOS)
- Open AFUWIN and open the newly modified Bios file. (MODBIOS)
- On the SETUP TAB click on LOAD CURRENT OPTIMAL under CMOS Options.
- Take a deep breath and Click Flash. DO NOT INTERRUPT THIS PROCESS. Let it complete.
- Reboot your server with original Celeron still in place to see if everything went right.
What did we change?
PECI was enabled and set to 1. PECI is Platform Environment Control or thermal control implemented into the Intel dual-core and not used for the Celeron 440. The MediaSmart Server will not boot if this setting is not changed and the dual-core installed. The PECI setting and speed stepping setting is totally transparent for the 440, so you can change/enable it at will. The Celeron will work just find with PECI set to either value.
The optional change disabled speed stepping (see this topic in this document for further info). Now that the correct BIOS setting are in place, let us start the hardware upgrade process.
>> Next page: The Hardware Upgrade Process: >> [[page]]
The Hardware Upgrade Process:
The Disassembly/Reassembly process:
Access to the processor is accomplished by the removal of the motherboard from the case assembly. This is an easy process and outlined here.
One note: When attempting to remove the top plate it is necessary to depress the retainer clip before attempting to slide the top plate forward. Failure to do so will result in the clip being damaged. Look inside the top drive bay at the roof of the MediaSmart Server. In the center, just a few inches back from the front, you will see a slot. Just to the rear of the slot is a clip that, when pushed up, will allow for the easy removal of the top plate.
Operating on the motherboard:
Always make sure you observe electrostatic procedures when you handle any sensitive electronic components, especially in dry climates with low humidity. Even the smallest static discharge can destroy or permanently damage a CPU or motherboard.
Once the CPU heat sink has been removed you will need to remove the thermal paste. Rubbing alcohol can be used for this. Remove the old processor by unlatching the retention clip and lifting upward, and clean off any residual thermal paste.
Install the new processor making sure to observe the orientation.
Use a 1/8 inch bead of Artic Silver 5 down the center of the new CPU, starting top to bottom leaving about 1/8 inch from the edge (as indicated in Figure 4):
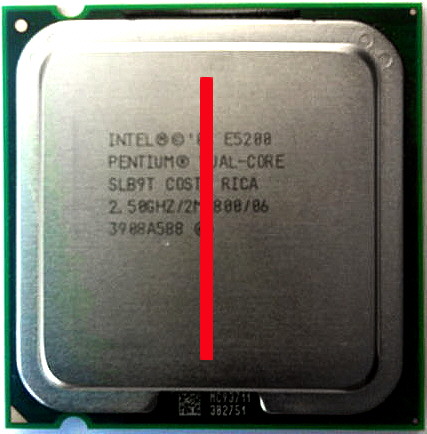
This is the recommended location and quanity per the Artic Silver website. Adding more than this is a waste of paste and makes a mess.
Carefully line up the heat sync and place it on the new processor. Gently rock the heat sync to allow the paste to distribute over the top of the processor.
Complete the re-assembly procedure. While doing so, there is a cable assembly that runs across the fan in the front of the MediaSmart Server. Using the slack in the cable, pull it down and out of the way of the fan. Then, using a cable tie, secure the cable out of the way of the fan. This will help provide a clear path for the air which will aid in cooling.
Re-install the hard drives, and then reconnect the network and power cables. Have your PC with the Home Server Connector booted and online.
Next, power up the MediaSmart Server and observe the health indicators. If all is well the system should be fully booted and accessible via the Home Server Connector. If all appears normal but you cannot access the system, perform a MediaSmart Server power down/reboot.
If at this point you still do not have access you can connect your KVM switch, which should allow you to see the status of the system. On a normal boot the console will present a login screen. If you see this screen you (more than likely) have a networking/connectivity issue and not a CPU related problem.
Depending on the problem and health indicators, trace back your installation procedures. If you don’t have a KVM adapter your worst-case scenario would require you to re-install your original processor to do additional troubleshooting and BIOS verification.
Speed stepping settings:
There is much controversy about whether speed stepping should be enabled or disabled. This discussion should help your make your choice.
First, what is speed stepping (or dynamic frequency scaling, as it is otherwise known)? It is the ability of the processor to up-shift or down-shift the clock speed of the processor based on load conditions. The advantages to speed stepping are less heat and power draw, while the disadvantages are CPU overhead required for speed management, time lag, and low optimization.
Microsoft suggests speed stepping should be disabled if problems are occurring with video processing. During testing I found that disabling speed stepping provided a noticeable performance difference with negligible heat or power increases. I was never able to achieve maximum core clock rates with speed stepping enabled… no mater how much I loaded the CPU. Based on the Microsoft recommendation and tests I have it disabled in my server.
If you would like to disable speed stepping, access the BIOS using the KVM adapter and set speed stepping to “disabled.” This can also be accomplished using the earlier procedure to change the PECI setting and flashing the BIOS with the change. Use the instructions listed above, but substitute “Speed stepping disabled” for PECI 00 00. Complete the process and flash the change.
>> Next page: Wrapping up, Tests, Considerations, and Conclusion >> [[page]]
Wrapping up the CPU upgrade with a few tests and considerations:
Some Actual CPU Testing and SiSoftware Sandra Benchmark results:
CPU Aggregate Multi Media test Power Draw CPU Dhrystone CPU Whetstone
C-440 13.32 M/pixel/s 35.0 w 7.80 GIPS 7.30 GFLOPS
E5200 33.35 M/pixel/s 37.3 w 19.5 GIPS 18.44 GFLOPS
E6300 35.42 M/pixel/s 37.0 w 20.1 GIPS 19.02 GFLOPS
These performance results speak for themselves, and are very amazing. I ran a number of temperature tests and found the data to be inconclusive. When running CPU intensive testing I found that the Celeron had a slightly cooler temperature than the dual-core but carried that temperature longer. The dual-core would spike, but then recover to a lower temperature more quickly because it is a more powerful processor and able to complete the task faster. If both the 440 and 5200 was loaded to max capacity the Celeron would run slightly cooler.
Again, this is not a conclusive test because of the ability of the dual core to complete the task faster than the Celeron, not only because of the additional core but also the much larger cache. As a note, the dual core was never more than a few degrees warmer then the original Celeron and always with normal temperature values. These findings may also improve as the Arctic Silver 5 paste cures with time and dissipates heat more efficiently.
The power draw of the E6300 was surprising considering it provided slightly better results than the E5200. More than likely, this may be in part because it is a slightly newer generation core incorporating other improvements, but it also raises the conversion costs by an additional $30… not sure if its justified.
Larger CPU Cache:
A dual processor with a larger L2 cache (such as the E8200) may be of some benefit, but I wouldn’t expect a major increase in performance. As the prices come down I plan to work with the E8200, with its 6GB cache, just to see exactly what the difference will be.
Memory upgrade from 2gb to 4gb:
After some careful review and many conversations with some of the support engineers at HP, the common consensus is that the MediaSmart Server would not greatly benefit from a memory upgrade even though it can be easily upgraded to 4GB. This is mostly because of its role in life is a minimal server and really does not need more than the 2GB it already has. Unlike 32-bit editions of Windows XP, Windows Home Server can address a full 4GB.
Another issue is when you increase the density of memory on a chip you increase the power draw and heat dissipation.
The cost of the upgrade would be over $100, and would likely provide little return on that investment. The jury is out on this one until some detailed testing and analysis can be done. Should you wish to perform this memory upgrade, the correct part is “240-pin DDR2 SDRAM PC2 6400 G.SKILL Model #:F2-6400CL5S-4GBPQ.” It is a pin compatible replacement for the existing 2GB memory part and should be recognized by the server automatically without other changes.
Final Observation and Conclusion:
Overall, I am very pleased with the outcome of this project. It is a relatively easy task that just takes a little planning and time to complete. In my opinion, the results were well worth the time and money. It also extends the life-cycle of the EX485.
I am sure this will greatly help with the additional demands HP’s 3.0 upgrade will have now that it’s available. I selected the E5200 M0 as the processor of choice primarily because I want my MediaSmart Server to sleep at night when it’s not used, which should help to prolong the life of the unit.
It would be a great resource for all looking to complete this upgrade that those using other dual core processors share their experiences. When doing so, please consider the following:
- Before saying, “everything works great!” please do in-depth and thorough testing.
- List your exact configuration and what you modified or changed.
- It would also be useful to those tweaking BIOS setting would list them as well.
My thanks to those who take the time to share their work, making upgrades like these possible for all.
Dan